Sunday, August 5, 2012

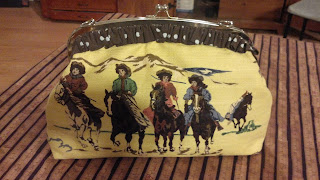
My first handbag!


This is  a handbag I made to celebrate the opening of Will Rogers Follies at Arizona Broadway Theatre.  I found this great website called U-Handbag.  It has awesome patterns and tutorials for all kinds of bags.  I LOVED learning how to put a purse onto a frame.....it looks so professional!  Now I have to make labels.  Nickela and I have opened a store on Etsy but we don't have much there, yet.
Here is the etsy link: http://www.etsy.com/shop/MLouRoo

Sunday, July 1, 2012

Happy July fourth week

I thought I would post this patriotic photo of ribbon I cut to make a Ribbon Drop for Will Rogers Follies.  It will take 140 ribbons at 18 ft in length, all sewn on a strip and weighted.  While I was cutting it felt very festive and I really just wanted to festoon a Better Homes & Gardens house with it.  We went on vacation instead.


Sunday, May 13, 2012

Costumes!

My friend Stacey Gordon asked me if I could make some costumes for her Old Time Photo Studio in Virginia City Montana.  The one below pays homage to Downton Abbey.  Nickela is my model.  It is so much fun making these clothes!  I just wish I had more time to make a ton more!
Check out Stacey's Photo Shop website:

Thursday, April 5, 2012

What I learned today......

I learned:  MAKE A BETTER BOX!  And:  BUY RICE.....
I was trying to make a mold of a dagger for Tarzan.  The You Tube videos from Smooth On (my product of choice) says to make an acrylic box and to ratchet it closed, then pour the rubber over your model.  Another You Tube video had said that really, any acrylic rectangle would work to make a box.  My problem with making that kind of box was that I could not ratchet it tight.  The hot glue did not hold my box together and I had an oozing mass of Mold Star 15 (SLOW CURING) rubber all over the table, all over Ally who was filming the process and all over myself!  We hastily tried to scrape some up and save it.  Then I used Corroplast (corrigated plastic like they use in yard signs) to build a better box.  Then I used duct tape for the ratchet and taped the box completely around it!  The result was that the mold finally worked but I have a weird and huge GLOB of cured rubber I don't know what to do with!
The dagger I carved that I am trying to cast in a flexible plastic or rubber.
The cured mass of Urethane rubber....such a waste!
After that mess, I moved on to a successful mold of a spearhead/rock I need to do.  Again, the You Tube videos say to first pour rice into the mold, then pour the rice into a clear container.  This will give you an idea of the volume of liquid plastic you will need to mix to pour into the mold.  Well, I did not do that!!!  (I was in a hurry and Ally was filming and all...)  I mix up the Smooth Cast 320....this only has THREE MINUTES TO CURE!!!!!  I start pouring and have a cup full left!  I race around trying to find older molds to pour the remaining plastic in, I don't want to waste it!  I am telling Ally, there must be SOMETHING we can make!!  I find a couple of molds of flat decorations.  PERFECT!  I start to pour, and SCREECH!  The plastic cures mid pour!


(HARD AS A.......well Hard as Smooth Cast 320!)
Luckily, the casting turned out fine, but still, the WASTE!!!  

Ally is the one that reminded me.....next time......BUILD A BETTER BOX AND BUY SOME RICE!!!
The Better box....duct taped  and waiting for tomorrow, when I try expandable foam to make the dagger....THAT ought to be a hoot!

Sunday, March 25, 2012

Family Portrait

We got 12 chicks on March 3rd.  I think we got 5 different breeds, but nobody can really remember what kind. The little ones were born on Feb. 29....Leap year babies!  The large white ones are maybe a couple of weeks older.  They are so cute when I open the coop in the morning and they all peek out before venturing into the larger pen.  When they are bigger, we will let them roam around the yard.  But right now our cats are keeping a hungry eye on them!

Friday, March 16, 2012

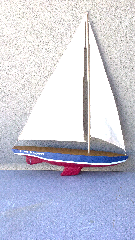
Ahoy!

Today I finished up some prop boats for Stuart Little.  I really want to elaborate on their decks but don't really need all that detail.  Next up is a pair of ice skates out of paper clips...mouse size and actor-playing-mouse size!


Saturday, March 10, 2012

My First Smash Book


Here is my first Smash Book page.  I found these accidentally and HAD TO HAVE ONE.  I will keep you posted with more pages soon!

Sunday, March 4, 2012

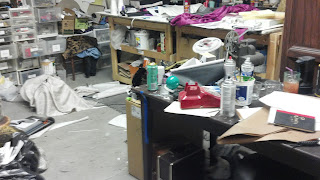
The aftermath

This is what the prop shop looked like as I was headed down to Opening Night for Sunset Blvd.


 The Opening went great!  Here is a photo of the HOUSE.  Not a great photo, sorry.

Wednesday, February 15, 2012

Trying to post from my phone.

I started making a monkey for Sunset Blvd today.  Sadly, it needs to be dead.  I started with one of those toy FurrReal monkeys.  I had to cut its arms and legs off!  Then I added the parts to a tiny monkey costume I made for my daughter when she was two.  It is coming along nicely, and a bit morbidly.

Here is the cutie before I got a hold of my scissors!
I think the arm might be a bit too long.....

Tuesday, January 17, 2012

Head above water

 The holidays are over, ABT opened 3 shows, my kids were in two shows, and we just moved!  NOW I can start blogging again!  (Not that I was very prolific before!)  So this post is a bit of bragging about a prop I made at the last second...literally, still drilling about 3 pm before Opening Night!  They are some steam-punky old-fashioned sound operator headphones.  I think they turned out pretty cute!
On my head!
My replica close-up.

My research 1.

My research 2.
I started with some airline headphones, and added wire to the top. I removed the foam around the ear pieces.  Drilled holes in the center of the earpieces.   I had found some old brown rubber furniture slides to put on the outside of the ear pieces, and also drilled hles in the center.  I had to Dremel a groove in the earpieces and the furniture slides to fit the small dowel "antennas" on. Spray painted various parts with the must-have Copper Metallic paint from Krylon.  I sandwiched the dowels in between the ears and the slides, bolting them together with my favorite small #6 screws and nuts.  Put the ear foam back on and gaff-taped some speaker cord to part of the original cord of the headphones!  Pretty cool, huh?